Creating a VHD in Windows 7

How To Create A VHD (Virtual Hard Disk) In Windows 7?
Unlike previous Windows versions, Windows 7 lets you create a new Virtual Hard Disk without the help any third-party applications.

Creating a Virtual Hard Disk (VHD) in Windows 7 is very simple.
Steps to create Virtual Hard Disk
1. Type in diskmgmt.msc in Start menu search filed and hit enter to open Disk Management window. Alternatively, right-click on Computer icon on the desktop, select Manage. In the Computer Management window, click on Disk Management link open the program.
2. In the Disk Management window, go to Action, and select Create VHD option.
3. In the following window, select a drive/folder location to create a new VHD file.
4. Next, enter the size of VHD. Make sure that you have enough free space before entering the VHD size. Here, you have the choice to choose between two VHD formats: Dynamically expanding, and Fixed Size (recommended).
In the dynamically expanding format, the size of the VHD expands to a fixed maximum size as data is saved to it. However, the disk size doesn’t compact automatically when data is deleted. As the name suggests, Fixed size VHD format uses a fixed amount of space regardless of the amount of the data stored in it.
5. Click on the create button to start the process. You will see a new VHD file.


Pin Computer to the Taskbar

How to Pin Computer to the Windows 7 Taskbar
Information
This will show you how to pin Computer to the Windows 7 taskbar as a separate icon instead of it being pinned as a Jump list item in the default pinned Window Explorer taskbar icon.

Note
When you have both the default Windows Explorer icon to the left and this Computer icon to the right of it, then each time you click on the Computer icon on the taskbar it will open another separate new window of Computer. Clicking on the Windows Explorer icon will only open the one window instance.
Warning
To avoid issues with other pinned “explorer” type shortcuts from displaying their opened windows in the thumbnail previews of whatever pinned “explorer” type shortcut is on the farthest left of the taskbar, be sure that the default pinned Windows Explorer taskbar icon is dragged to the left of this pinned Computer icon on the taskbar, and that any other pinned “explorer” type icon is dragged to the right of this Computer icon.
EXAMPLE: Computer Unpinned and Pinned from the Taskbar
EXAMPLE: Computer window
Manually Create the Download Shortcut
1. If you have not already, then uncheck the default Computer shortcut from the Desktop Icon Settings window.
2. Right click on a empty space on the desktop and click on New and Shortcut.
3. Type in the location in bold below and click on the Next button. (See screenshot below)
%SystemRoot%\explorer.exe shell:MyComputerFolder
OR
%windir%\explorer.exe shell:MyComputerFolder
OR
C:\Windows\explorer.exe /e,::{20D04FE0-3AEA-1069-A2D8-08002B30309D}
4. For the name, type Computer and click on the Finish button. (See screenshot below)
5. Right click on the new Computer shortcut on the desktop and click on Properties.
6. Under the Shortcut tab, click on the Change Icon button. (See screenshot below)
7. In the “Look for icons…” line, type in bold below and press enter. (See screenshot below)
%SystemRoot%\system32\imageres.dll
8. Select the Computer icon and click on OK. (See screenshot above)
9. Click on OK. (See screenshot below)
10. Drag the new Computer shortcut onto the taskbar until you see the Pin to Taskbar pop-up and drop it. (See screenshot below)
11. Computer is now pinned to the taskbar. (See screenshot below)
NOTE: 
If you ever wish to remove the pinned Computer icon from the taskbar, right click on it and click on Unpin this program from the Taskbar.
12. You can now delete the Computer shortcut on the desktop.

Restoring files from previous versions

Restoring files from previous versions
You can restore deleted files and folders or restore a file or folder to a previous state.

To restore a deleted file or folder
Open Computer by clicking the Start button Picture of the Start button, and then clicking Computer.
Navigate to the folder that used to contain the file or folder, right-click it, and then click Restore previous versions. If the folder was at the top level of a drive, for example C:\, right-click the drive, and then click Restore previous versions.
You’ll see a list of available previous versions of the file or folder. The list will include files saved on a backup (if you are using Windows Backup to back up your files) as well as restore points, if both types are available.
Note
To restore a previous version of a file or folder that’s included in a library, right-click the file or folder in the location where it’s saved, rather than in the library.
For example, to restore a previous version of a picture that’s included in the Pictures library but is stored in the My Pictures folder, right-click the My Pictures folder, and then click Restore previous versions.
Double-click a previous version of the folder that contains the file or folder you want to restore. (For example, if a file was deleted today, choose a version of the folder from yesterday, which should contain the file.)
Drag the file or folder that you want to restore to another location, such as your desktop or another folder.
The version of the file or folder is saved to the location that you selected.
Tip
If you don’t remember the exact file or folder name or its location, you can search for it by typing part of the name in the search box in the Documents library.
To restore a file or folder to a previous state
1.   Right-click the file or folder, and then click Restore previous versions.
You’ll see a list of available previous versions of the file or folder. The list will include files saved on a backup (if you’re using Windows Backup to back up your files) as well as restore points, if both types are available.
2.   Before restoring a previous version of a file or folder, select the previous version, and then click Open to view it to make sure it’s the version you want.
Note
You can’t open or copy previous versions of files that were created by Windows Backup, but you can restore them.
3.   To restore a previous version, select the previous version, and then click Restore.
   
Warning
The file or folder replaces the current version on your computer, and the replacement can’t be undone.
   
Note
If the Restore button is unavailable, you can’t restore a previous version of the file or folder to its original location. You might be able to open it or save it to a different location.

Windows 7 Features – Virtual Hard Disk

Virtual Hard Disk

The Microsoft virtual hard disk (VHD) file format specifies a virtual hard disk, which is encapsulated in a single file and is capable of hosting native file systems and supporting standard disk operations. This topic contains an overview of the new functionality that is offered in this version of Windows.


In Windows 7, VHD can be used as the running operating system on designated hardware without any other parent operating system, virtual machine, or hypervisor. You can use the disk management tools (the DiskPart command-line tool and the Disk Management MMC snap-in) to create a VHD file. You can then deploy a Windows 7 image (in .wim format) to the VHD and configure the boot manager for a native or physical boot of the Windows image, which is contained in the VHD.


Benefits of the new and changed features of VHD

Enterprise environments that already manage and use VHDs for virtual machine deployment will find the most benefit from the new features in this release. Although enterprise environments are moving an increasing number of applications to virtual machines, they still use physical computers to operate a significant part of the data center. For this reason, IT administrators have to maintain two sets of images: one set based on the .wim format for physical computers, and another set based on the VHD format for virtual machines. The VHD format supports physical computers and virtual machines, and it provides flexibility in image deployment and simplifies image management.

An image format that runs on both physical computers and virtual machines also benefits developers and testers. This is because they use virtual machines to test new system and application software, but sometimes they need to run tests on physical computers to access a specific hardware device, like the graphics card, or to get accurate performance profiling. Native VHD boot also enables developers and testers to boot into a Windows 7 image without creating a separate partition on the physical computer for installing Windows. 

Enable or Disable Problem Steps Recorder

How to Enable or Disable Problem Steps Recorder in Windows 7
Information
You can use Problem Steps Recorder to automatically capture the steps you take in Windows 7, including a text description of where you clicked and a screen shot during each click. Once you capture these steps, you can save them to a .zip file containing a .mht (MHTML) file of them. This file can then be used by a support professional or someone else helping you with a computer problem. If you like you can use it as a sort of Slide Show type demo to.
This article will show you how to enable or disable the ability of all users to use Problem Steps Recorder in Windows 7.

You must be logged in as an administrator to be able to do this tutorial.
EXAMPLE:
Problem Steps Recorder
Through the Local Group Policy Editor
1. Open the Local Group Policy Editor.
2. In the left pane, click on to expand Computer Configuration, Administrative Templates, Windows Components, and Application Compatibility. (see screenshot below)
3. In the right pane, right click on Turn off Problem Steps Recorder and click on Edit. (see screenshot above)
4. To Enable “Problem Steps Recorder” in Windows 7
A) Select (dot) either Not Configured or Disabled. (see screenshot below step 6)
NOTE:
Not Configured is the default setting.
B) Go to step 6.
5. To Disable “Problem Steps Recorder” in Windows 7
A) Select (dot) Enabled. (see screenshot below step 6)
6. Click on OK. (see screenshot below)
7. Close the Local Group Policy Editor window.
8. If enabled, users will be able to use Problem Steps Recorder.

DISPLAY FREQUENTLY USED PROGRAMS IN THE NOTIFICATION AREA

HOW TO DISPLAY FREQUENTLY USED PROGRAMS IN THE NOTIFICATION AREA

All of us know, In Windows 7 accessing programs is much easy and you can find them right in the start menu. But it is always good to find something much easier

In accessing frequently used and favorite programs like VLC Media Player or Internet Explorer, the notification area can be used as a one click point to open those programs
This articles does not apply to Windows XP or any other version of Windows
Here’s how:
Open the application that you would like to have an icon in the notification area
Click on the Up Arrow in the right bottom corner of the screen. You would see the icon of the application or the external hardware connected to the computer
Just drag and drop the icon into the task bar
Kudos!! You have just set your favorite application on the notification area
To remove the any icon from the notification area, click on the Up arrow and click on “Customize”
In the Window that opens, choose what you would like to do with the icon of each application like hide icon and notifications etc.

Enable or Disable Windows 7 Pop-up Descriptions

How to Enable or Disable Windows 7 Pop-up Descriptions
Information
This will show you how to enable or disable Windows 7 pop-up descriptions that display file information when you hover your mouse pointer over files, folders, or drives, on the desktop and in Windows Explorer. By default, a pop-up description is enabled in Windows 7.

Note
This does not affect pop-up descriptions for items on the taskbar like the Start Menu button and notification area icons, or the pop up when you are scrolling using the vertical scroll bar in Windows Explorer.
EXAMPLE:
Pop-up Descriptions

OPTION ONE
Through Folder Options
1. Open Folder Options.
2. Click on the View tab. (See screenshot below)
3. To Disable Pop-up Descriptions
A) Uncheck Show pop-up description for folder and desktop items, and then click on OK. (See screenshot above)
4. To Enable Pop-up Descriptions
A) Check the Show pop-up description for folder and desktop items, and then click on OK. (See screenshot below step 2)
OPTION TWO
Through the Registry
1. Open the Start Menu, then type regedit in the search line and press enter.
2. If prompted by UAC, then click on Yes.
3. In regedit, go to: (See screenshot below)
Code:
HKEY_CURRENT_USER\Software\Microsoft\Windows\CurrentVersion\Explorer\Advanced
4. In the right pane, right click on ShowInfoTip and click on Modify. (See screenshot above)
5. To Enable Pop-up Descriptions
A) Type 1 and click on OK. (See screenshot below)
B) Go to step 7.
6. To Disable Pop-up Descriptions
A) Type 0 (number zero) and click on OK. (See screenshot above)
7. Close regedit.

Change the Time to Change Password

How to Change the Time to Warn a User to Change Password Before Expiration
Information
If you have password expiration enabled, then this will show you how to change how far in advance (in days) users are warned that their password is about to expire.

Warning
You can only do this while logged in as an administrator.
OPTION ONE
Through Local Security Policy Manager
NOTE:
This option is only available for the Windows 7 Professional, Ultimate, and Enterprise editions.
1. If you have not already, you must enable password expiration for each user account that you want to have their password expire for that user to be able to get a warning that their password will expire before the maximum password age has been reached.
2. Open the Local Security Policy editor.
3. In the left pane, expand Local Policies, and click on Security Options. (see screenshot below)
4. In the right pane, double click on Interactive logon: Prompt user to change password before expiration. (see screenshot above)
5. Type in how many days you want Windows 7 to begin prompting users to change their password before it expires, then click on OK. (see screenshot below)
6. Close the Local Security Policy editor.
OPTION TWO
Through Registry Editor
NOTE:
This option is available for all Windows 7 editions.
1. If you have not already, you must enable password expiration for each user account that you want to have their password expire for that user to be able to get a warning that their password will expire before the maximum password age has been reached.
2. Open the Start Menu, then type regedit in the search box and press enter.
3. If prompted by UAC, then click on Yes.
4. In regedit, navigate to the location below: (see screenshot below)
Code:
HKEY_LOCAL_MACHINE\SOFTWARE\Microsoft\Windows NT\CurrentVersion\Winlogon
5. In the right pane of Winlogon, double click on PasswordExpiryWarning. (see screenshot above)
6. Select (dot) Decimal, then type in how many days you want Windows 7 to begin prompting users to change their password before it expires and click on OK. (see screenshot below)
7. Close regedit.
8. Restart the computer to fully apply.

Missing USB Drive in Windows 7

Sometimes when you plug a USB drive into your machine you won’t see it in Computer or AutoPlay in Windows 7.Now we would take a look at how to change the drive letter so you can can access it.

The problem with not being able to see your USB drive happens quite often in XP. Our Texperts have pointed out instances, where the same problem can occur in Windows 7 as well. 

Locate and Access the USB Drive in Windows 7 

The problem is when you plug in a thumb drive or external USB hard drive…nothing happens. You hear the USB sound but AutoPlay doesn’t run, and when you look in Computer you don’t see the drive. More than likely Windows named the drive to a letter that is already in use.

To fix the problem right-click on Computer from the Start Menu or Desktop Icon, and select Manage.


In the Computer Management window, under Storage, click on Disk Management to see a list of drives connected to your machine.


You should be able to determine which one is the drive you’re trying to access by its size and format type. Here we’re trying to find a 4GB thumb drive. Right-click on the drive and select Change Drive Letter and Paths.


Now click on the Change button…


You can select from a list of drive letters to rename it. Make sure it’s not one already in use or could be in use at some point. Pick a letter toward the end of the alphabet for best results.


You will be prompted with a warning dialog making sure you want to change the drive letter…click Yes.


Here you can see we changed the drive from the letter “J” to “U”…


If you have AutoPlay enabled, you’ll see the familiar screen asking what you want to do with the drive.


You will also see it in Computer now and be able to access the files and programs from it.


That’s all there is to it! It’s definitely annoying when you plug in an external USB drive and Windows doesn’t give you access to it right away, but following these steps solves the issue.

Create an Elevated Program Shortcut

How to Create an Elevated Program Shortcut without a UAC Prompt
Information
This will show you how to create a elevated “Run as administrator” shortcut of any installed program in Windows using Task Scheduler so that it will not give you a UAC prompt for permission when you start it while still having UAC turned on.
In the tutorial, you will first create a new task, then a new shortcut to run the task. Afterwards, how to change the icon of the shortcut.
Note
Special thanks to OEM for pointing this out, and the previous Vista version by DMEX.
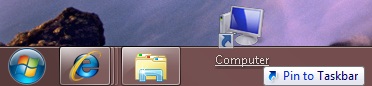
You can run at startup as a task, Pin to Start Menu, Pin to Taskbar this shortcut, or move to where you like for easy use.
Warning
This shortcut and task can only be created and work while logged in as an administrator account. This shortcut will not work in a standard user account.
Here’s How:
1. Open the Start Menu, then type taskschd.msc in the search line and press enter.
NOTE:  
This will open Task Scheduler. This file is located at:
C:\Windows\system32\taskschd.msc.
2. While having Task Scheduler Library selected in the left pane, click on Create task in the far right pane. (see screenshot below)
3. Under the General tab, type in the “Name” of the program you want to create this shortcut for. (See screenshot below)
NOTE: 
This will be the name of the task. As an example, I will use CCleaner for that program. Make note of this name, you will need it later in step 12 below.
4. Check the Run with highest privileges box. (See screenshot below)
5. Click on the Configure for drop down box to open it, and select Windows® 7, Windows Server™ 2008 R2. (see screenshot above and below)
NOTE:
This is like compatibility mode. If the program does not support running in Windows 7 normally, then you can select the OS that is does support running in instead to have it run in compatibility mode as if it was running in that OS instead of Windows 7.
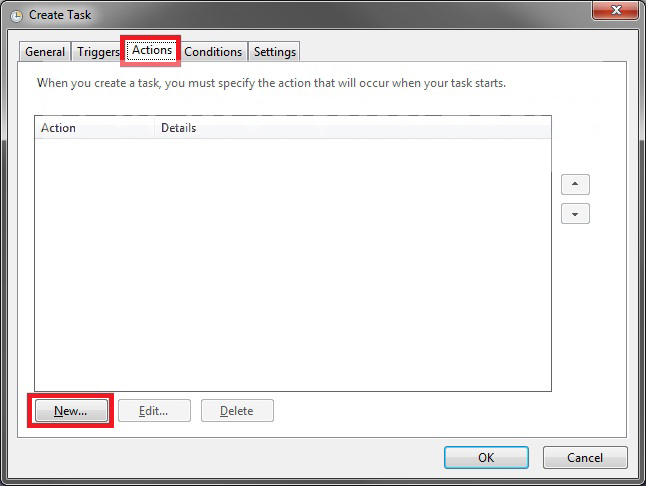
6. Click on the Actions tab, then on the new button. (See screenshot below)
7. Under “Action”, select Start a program and click on the Browse button. (See screenshot below)
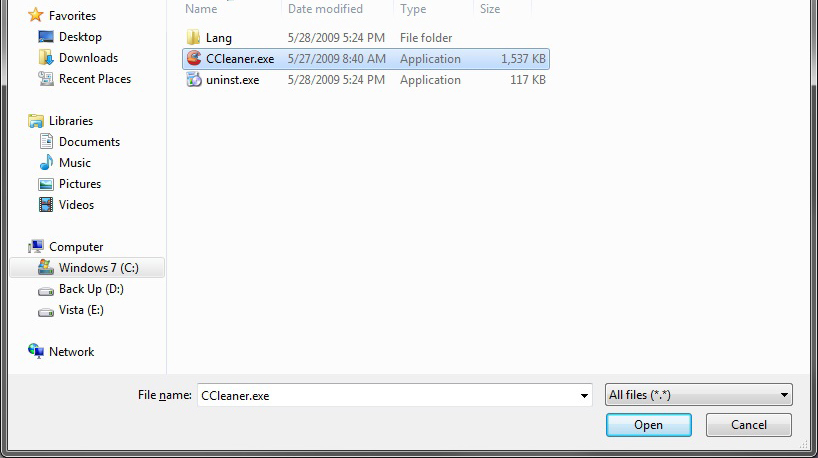
8. Navigate to the .exe file of the program that you want to create this shortcut for, then select it and click on Open. (See screenshot below)
9. Click on OK. (See screenshot below)
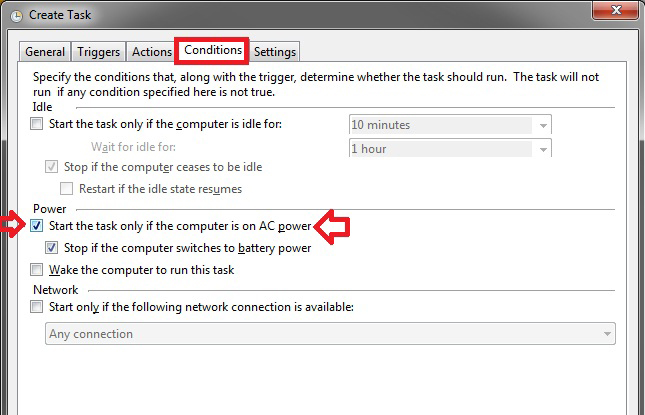
10. Click on the Conditions tab, and un check the Stop if the computer switches to battery power box first, then un check the Start the task only if the computer is on AC power box. (See screenshots below)
NOTE:
This step is mostly for laptops, so that you will be able to run the program when the laptop is running on battery power.
11. Click on OK. (See screenshots above)
12. You will now see your new task created with the name (ex: CCleaner) you gave it in step 3. Close Task Scheduler. (See screenshot below)
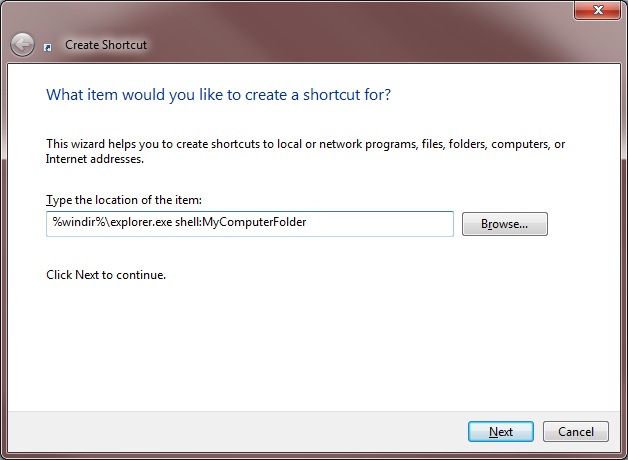
13. Right click on a empty area of the desktop, then click on New and Shortcut.
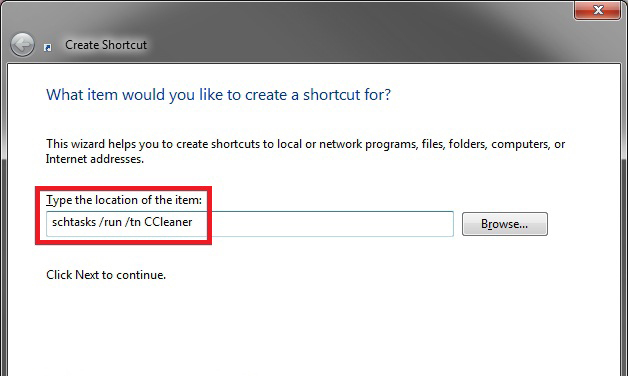
14. Type in schtasks /run /tn task-name for the location, then click on the Next button. (See screenshot below tip)
Tip
Substitute task-name with the name that you used in step 3 and see in step 12 (ex: CCleaner).
NOTE:
Note the space after schtasks, run, and tn in the commands below.
For a Name without Spaces – For example, type:
schtasks /run /tn CCleaner
For a Name with Spaces – You will need to have quotes around the name if it has spaces. For example, type:
schtasks /run /tn “Cleaner Program”
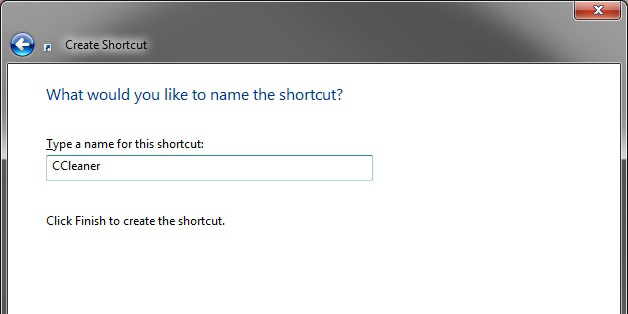
15. Type in a name you want for the shortcut (ex: CCleaner), then click on the Finish button. (See screenshot below)
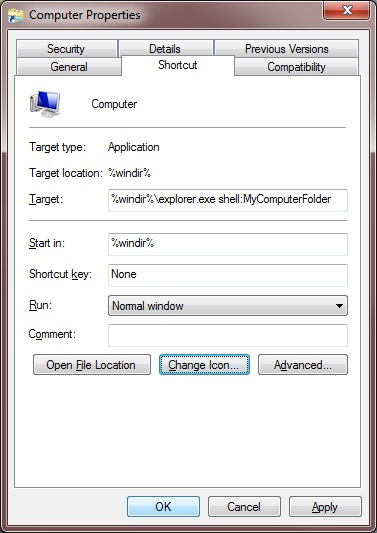
16. Right click on the new shortcut (ex: CCleaner) on the desktop, then click on Properties.
17. Click on the Shortcut tab and on the Change Icon button. (See screenshot below)
18. Click on OK. (See screenshot below)
19. Click on the Browse button. (See screenshot below)
20. Navigate to the .exe file of the program that you have created this shortcut with, then select it and click on Open. (See screenshot below)
NOTE:
If you have an icon of your own that you would prefer to use instead, and then navigate to where you have that icon saved at instead.
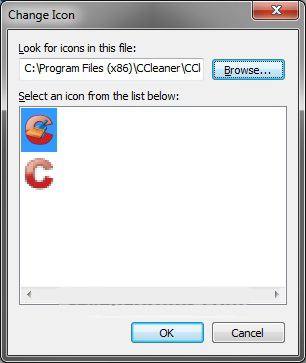
21. Select the icon you want for the shortcut, and then click on OK. (See screenshot below)
22. Click on OK. (See screenshot below)
23. You can now run at startup as a task, Pin to Start Menu, Pin to Taskbar this shortcut, or move to where you like for easy use.
24. When you run this new elevated shortcut, you will now no longer have to click on YES to approve the UAC prompt to allow the program run as administrator.
Tip
To Undo and Remove this Task:
While having Task Scheduler Library selected in the left pane, right click on the task in the right pane that you created in step 12, then click on Delete and yes to approve.
Delete the shortcut.